 Baking Meringues is always intimidating for a novice baker, but with a few pointers in mind, and a couple disasters at the beginning, you’ll be on your way to making the perfect meringues, whether they are plain ones for cookies, or the more fancier varieties for desserts like pavlovas! meringues are a perfect way to use up leftover egg-whites, and are great when entertaining. Here are the tips and techniques you’d need while baking meringues, and what is the big deal about soft and stiff meringue peaks!
 [adapted from an article originally published via What’s Cooking America]
Meringues – How it Works
Whipping egg whites are much like blowing air into a balloon. Beating or whisking causes the protein in the egg whites to unfold, forming films that trap the air bubbles, and the sugar stiffens the foam. A meringue is really nothing but a foam, which in turn, is a big collection of bubbles. The fat content in egg yolks will break the bubbles, hence the stress on being extremely careful while separating egg whites and yolks.
Type of Eggs Used
Meringue recipes work better with eggs that are at least 3 or 4 days old, but NOT more! Thin, older egg whites whip more easily to a higher volume than thick, fresh egg whites. Once whipped, the foam from thin whites is less stable because the liquid film drains more easily from the bubbles. If volume is more important than stability, then older eggs are better to use. For better stability, a good rule of thumb is to use fresher eggs for meringues, saving older ones for general baking.
Separating Egg Whites
Cold eggs separate more easily than those at room temperature because the whites hold together better.
Crack the egg and hold the shell halves over a bowl. Transfer the yolk back and forth between the halves, letting the white drop into the bowl. This takes some amount of practise, so I prefer using an EggCracker instead, as its very easy and not at all messy.
The tiniest bit of fat or egg yolk will wreck a meringue, as fat interferes with the formation of good foam. When separating eggs, if a speck of egg yolk falls into the egg whites, lift it out with an empty eggshell half. Do not try to fish it out with your fingers; the oil on your skin will prevent the egg whites from expanding. Avoid letting your fingers touch the areas that will come in contact with the egg whites. That way, you’ll avoid leaving oils from your hands on the utensils you just washed.
Correct Temperature
After separating, bring egg whites to room temperature to ensure volume when beating, as warmer eggs whip faster than cold eggs. Egg whites right out of the refrigerator will not whip well. The ideal temperature to whip a common meringue is room temperature, about 70 degrees F. Usually 30 minutes is adequate to ensure room temperature, and hence at least 6 to 8 times its original volume.
Using Clean & Dry Bowls
Copper, stainless-steel, or glass bowls work best for making meringues. Avoid using plastic bowls for whipping egg whites as they can often harbor traces of grease or fat, which prevents the whites from getting stiff. Whichever type of bowl you use, be sure it’s spotlessly clean.
Next, make sure your bowl is completely grease-free, and dry. Meringues are very sensitive and they don’t like any moisture. Don’t make meringues on a rainy or really humid day. Remember that they are mostly air and if that air contains a lot of water, you’ll have wilted peaks.
Whipping Up the Egg Whites
Place the egg whites into a large, tall bowl and set your mixer to medium-high speed setting. Beating or whisking causes the protein in the egg whites to unfold, forming films that trap the air bubbles, and the sugar stiffens the foam. As the mixing time increases, the bubbles become smaller and more numerous; this increases the volume and makes a more-stable structure.
Adding Sugar
Do not add sugar before whipping the egg whites. Adding sugar at the beginning can double the time you have to whip the egg whites to get a foam. Add the sugar at the very end when the whites have formed soft peaks.
Its better to use superfine sugar when making meringue because it dissolves faster. Gradually add the sugar, a few spoonfuls at a time, beating the whole time. As a general rule, add a total of 1/4 cup of sugar for each egg white. To tell if the sugar is dissolved when you are beating egg whites for meringues, rub a bit of the foam between your fingers. If it feels gritty, the sugar is not dissolved, so keep beating for a few more minutes.
Hard & Soft Meringue Peaks
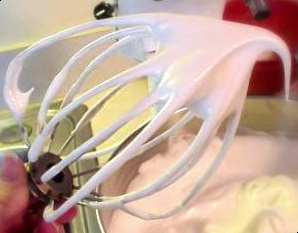
For soft peaks – place egg whites in a clean glass or metal bowl (not plastic), and beat with an electric mixer on medium-speed or with a rotary beater until egg whites form peaks with tips that curl over downwards (pictured above) when the beaters are lifted. For stiff peaks, continue beating egg whites on high-speed until they form peaks with tips that stand straight up when the beaters are lifted.
The Final Touches
Once you start a making whipped egg whites, continue it straight through and finish it off. Do not stop halfway to take a break.
The meringue is done when it is not runny and when you can hold a spoonful of it upside down and none of it drops off. Also when you swirl a spoon through it and the swirls hold their shape indefinitely.
Baking Meringues
Pipe the meringue out onto the prepared baking sheet using a large round tip or star tip on a piping bag. Baking the meringues in a slow oven allows for gradual evaporation of the moisture from the meringues. If the oven temperature is too high, the outside of the meringue will dry and set too quickly. Another indicator that your oven is too high is when the meringue starts to brown which causes the sugar to caramelize. If this happens, lower the temperature about 25 degrees F. Lastly, to prevent cracking of the meringues, do not open the oven door during the first half of the baking time.
Additional Tips
The standard ratio when making hard meringues is 1/4 cup (50 grams) of granulated white sugar for every egg white. This amount of sugar is needed to give the meringue its crispness. Adding the sugar gradually to the egg whites ensures that the sugar completely dissolves and does not produce a gritty meringue. Cream of tartar is used in the whipping of egg whites to stabilize them and allows them to reach maximum volume. Also, it is a good idea to use parchment paper or aluminum foil to line your baking sheets, not wax paper, as the meringue will sometimes stick to wax paper.
Hope these Tips and techniques help you bake your perfect Meringues. And once you get the hang of it, you can try these delicious meringue recipes:
Mixed Berry Dessert Pavlova
Meringue Cookies
Heidi’s Ghost Meringue Cookies


Wow! I didn't know about the plastic bowl problem or the oil problem! This tutorial will REALLY help! Thanks! 🙂
Thanks for your tips. I was wondering why my meringue didn't stiffen when I was beating it but now I understand it was because there was the tiniest bit of yolk in the mix and also I took the separated egg whites straight from the fridge. I'm sure it will be better next time!
Thanks, Emma
This post is really enlightening!
I used these tips to bake my emringue cookies, and I have to say they really did come in handy! especially about whipping time, and the oven temp!
thansk again!
shirley
anita – I learnt it the hard way too; so I’m hoping this will help a few:)
sarah – thanks so much for the encouraging words! I hope I can make this better than my blog!:) I haven’t publicly launched this yet:D, but plan to do so soon!!
making meringues is always a bit intimidating! thanks for making this check-list – will surely help a lot of people, including me!:)
btw, I came here from your pavlova recipe on your blog – I just love it, and its great that you started this space too! looking forward to more cooking tutorials:D
~sarah
that’s a brilliant tutorial! its always hard to know if I’ve beaten my egg whites more or less; these tips will come in handy for my next trial:)
~anita